Electrostatics Lab
Purpose
The goal of this exercise is for you to observe the two different types of charge and the various means by which these can be produced and detected. Also you will gain firsthand experience with materials (conductors and insulators), devices (proof planes and electroscopes), and processes (conduction, induction, triboelectrification).
Materials
Ring stand
Red clamp
Nonmetallic pen or pencil
Scotch tape
Electroscope set (includes charge sampler, two proof planes and insulated handle)
Two electrical cables (one of each: double banana plug and banana plug/alligator clip)
Plastic pipe (CPVC)
Wool pad
Glass rod
Balloon
Procedure
Part A – Charged Tape!
Ordinary Scotch tape has interesting electrical properties. The basic procedure for developing an electric charge on a piece of tape is simple: just remove it from something to which it was stuck! This process is sometimes referred to as triboelectrification – charging due to contact between two materials. In order to observe the charge on a piece of tape, it is handy to have a horizontal rod on which to hang it. Attach a pen or pencil (preferably wood or plastic) to a ring stand in order to make a horizontal support to which the tape can be attached and hung. See the diagram below. Follow the directions and record observations.
Note: the electric charge on a piece of tape will dissipate over time (more so in humid conditions). So, you may have to “recharge” the tape or get a new piece if it hangs too long.
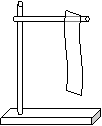
1. Remove a piece of tape about 10 to 15 cm long (4 to 6 in). Fold over about 0.5 cm at one end of the tape to form a non-sticky “handle”. Press the tape firmly on the surface of the table and then use the handle to remove it. Hang the tape on the stand as shown in the diagram.
2. Prepare another piece of tape in the same manner as the first one. Holding the tape by one end, bring the second piece close to the first (as if you were going to attach it to the same place on the ring stand). Observe the interaction between the two pieces of tape as you vary the separation distance. Record your observations – be specific.
3. Now prepare a tape “pair”. Make a piece of tape as you did in step #1 and tape it to the table. Write the letter “B” (for bottom) on the handle. Attach an identical piece of tape directly on top of it and label it “T” (for top). You now have two pieces of tape stuck together, one on top of the other, with sticky sides down – sort of like two pieces of bread in a sandwich. Grasping both handles, remove the pair as one unit and then separate the two pieces and hang on the support side by side.
4. Prepare a second pair labeled B and T and hold one at a time next to the hanging B and T tapes. Observe the interactions and record and summarize what you find.
5. Prepare a single tape as in step #1 and observe its interactions with the B and T types. What type is a single tape? Record your observations.
6. Simply remove a piece of tape from the dispenser and compare to the B and T types. What type is this? Record your observations.
7. Rub the plastic pipe with the wool pad and compare to the B and T types. Based on the table showing the triboelectric series what can you conclude about the B and T types? Which is positive? Which is negative? Explain based on your observations.
8. Rub the glass rod with the wool pad and compare to the B and T types. Is the rod positive or negative? Explain based on observations.
9. Temporarily
remove the horizontal support from the ring stand (with B and T
types still attached). Test the metal rod of the ring stand or its metal base
against the two types. Observe the interactions and record your observations.
Reattach the horizontal support to the ring stand.
Part B – the Electroscope
The electroscope is an apparatus designed to detect and (qualitatively) measure electric charge. Electroscopes come in a variety of configurations, but always involve metallic surfaces that repel one another when a charge is introduced. The electroscope you will be using consists of a metal “needle” that can swing very easily around an axis but which normally will stay in a vertical position because of a very slight imbalance in its weight distribution. The needle’s axle is held by an “S-shaped” metallic support structure. If the needle and support structure have the same type of electric charge the needle will deflect from vertical. Greater amount of charge will deflect the needle further. The support structure connects to a “charge sampler” on top of the electroscope. Charged objects are brought near the sampler and/or touched to it.
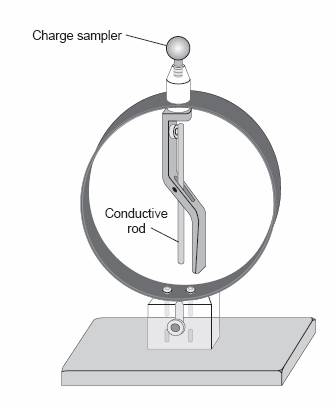
Connect the base of the electroscope to ground using a cable as directed by your instructor. Connect a second cable to the same point on the base. The second cable may be used to discharge the electroscope by simply touching the free end to the metal support or charge sampler. When not in use this second cord may be clamped to the circular shielding ring.
Important note: the charge sampler, support structure, and needle are all metallic conductors that are interconnected such that charge can move throughout these three objects. However, these surfaces are insulated from the rest of the electroscope.
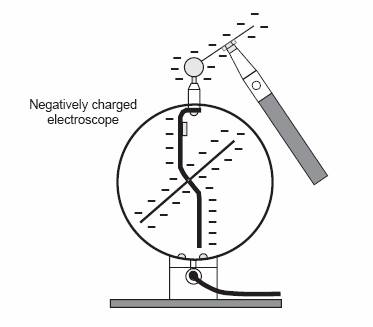
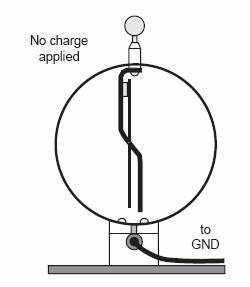
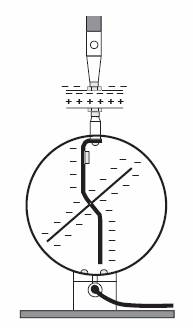
Note: the electroscope diagrams are meant to be only a general guide. The steps that follow do not exactly match what is shown. Read carefully!
1. Rub the plastic pipe with the wool. Bring the pipe near the charge sampler without touching and take it away again. Note the response of the needle. Record your observations.
2. Rub the plastic pipe with the wool. Bring the pipe toward the sampler slowly. You may hear a spark before contact occurs. Touch the pipe to the sampler. Move the pipe away from the sampler. Note the behavior of the needle. Record your observations.
3. The electroscope should remain charged for a good while after touching it with the pipe. With the electroscope already charged try rubbing the pipe again and bringing it near the charge sampler without touching and take it away again. Note the response of the needle. Record your observations.
4. Now rub the glass rod with the wool. Bring the rod near the charge sampler without touching and take it away again. Note the response of the needle. Record your observations.
5. Discharge the electroscope by touching the grounding cable to the metal support or the charge sampler. The needle should return to a vertical orientation.
6. Rub
the glass rod with the wool. Bring the rod toward the sampler slowly. You may
hear a spark before contact occurs. Touch the rod to the sampler. Move the
rod away from the sampler. Note the behavior of the needle. Record your
observations.
Note: The glass rod is typically not as “strong” as the plastic pipe. It
may require more rubbing with the wool. Also, rubbing the wool on the plastic
pipe before using it to charge the glass rod should increase its
effectiveness (why?). When attempting to transfer charge from the glass rod to
the electroscope it is sometimes helpful to touch the charge sampler all along
the length of the rod in order to pick up charge from different parts of the
rod. In other words touch the glass rod on the charge sampler and then run it
back and forth and rotate it.
7. Discharge the electroscope by touching the grounding cable to the metal support or the charge sampler. The needle should return to a vertical orientation.
Part C – Charge by Induction
1. Start with the electroscope completely discharged. Is it possible to produce a “permanent” net positive charge on the electroscope by using a negatively charged object? Read on to find out.
2. Rub the plastic pipe with the wool. Bring the pipe near the charge sampler without touching (but close enough to make the needle deflect) and keep it there, being careful not to actually transfer charge. With the charged pipe in this position make contact between the bottom end of the needle’s support structure and the grounding cable.
3. Remove the grounding cable first and then remove the pipe from the vicinity of the charge sampler. If successful, the needle will remain in a deflected position indicating a net charge on the electroscope. Test the response of the needle to the presence of the plastic and/or the glass rod in order to determine the type of charge on it. You should find that the electroscope now has a net positive charge. You may have to try this a few times to get the sequence of events correct and obtain a successful outcome. Record observations.
4. Can you repeat the process outlined above starting with the positive glass rod and ending with a negative charge on the electroscope? Try it and see! Record observations.
Part D – Fun With Charge!
Experiment with the charged tape and/or the electroscope to determine answers to the following questions – in each case record your answer and explain the observations that led to your conclusions.
Note: you may want to experiment with the “proof planes” – these are the metallic discs in the set. The proof plane on the insulated handle may be used to collect and transfer charge. Attaching the other proof plane to the top of the electroscope in place of the charge sampler may make the needle more sensitive to certain charged objects upon which charge is spread out on a surface.
1. Inflate
the balloon and tie it off. Rub one side of the balloon on your hair.
(a) Determine what type of charge is on the balloon.
(b) Is the charge spread out evenly over the entire surface of the balloon?
2. Rub the plastic pipe with the wool pad but this time test the charge on the wool pad. What type is it? Be patient and persistent – this is sometimes a difficult thing to observe.
3. Can you produce a fairly long piece of tape that is positive on one half its length and negative on the other half? It should be possible – explain how you did it and how you were able to observe the presence of the oppositely charged halves.
4. Can you completely discharge the charged electroscope by touching it with another charged object (instead of grounding it or touching it with your hand)?
5. Try removing the charge sampler or proof plane from the electroscope and in its place connect the banana plug/alligator clip cable. Try producing a charge on the electroscope by sending charge through the cable from the alligator clip end to the other end. Be patient - you may have to send a lot of charge through the wire before noticing a charge on the needle.
Questions (respond in complete sentences on separate paper)
1. The process of charging by conduction is illustrated by what observation(s) made during the experiment? Explain with specific references.
2. The process of charging by induction is illustrated by what observation(s) made during the experiment? Explain with specific references.
3. The properties of insulators are illustrated by what observation(s) made during the experiment? Explain with specific references.
4. The properties of conductors are illustrated by what observation(s) made during the experiment? Explain with specific references.
5. Explain how and why the grounding cable works to discharge the electroscope regardless of which type of charge is upon it.
6. Explain how your observations support and/or refute the table of triboelectric tendencies.
7. Explain how your observations support and/or refute the conservation of charge.
Triboelectric tendencies:
|
Most Positive |
|
|
Air |
|
|
Human Hands, Skin |
|
|
Asbestos |
+ + + |
|
Rabbit Fur |
|
|
Glass |
|
|
Human Hair |
|
|
Mica |
+ + |
|
Nylon |
|
|
Wool |
|
|
Lead |
|
|
Cat Fur |
+ |
|
Silk |
|
|
Aluminum |
|
|
Paper |
|
|
Cotton |
0 |
|
Steel |
0 |
|
Wood |
|
|
Lucite |
|
|
Sealing Wax |
|
|
Amber |
|
|
Rubber Balloon |
|
|
Hard Rubber |
|
|
Mylar |
− |
|
Nickel, Copper |
|
|
Brass, Silver |
|
|
Synthetic Rubber |
|
|
Gold, Platinum |
|
|
Acetate, Rayon |
|
|
Polyester |
|
|
Celluloid |
− − |
|
Polystyrene (Styrofoam) |
|
|
Orlon, Acrylic |
|
|
Cellophane Tape |
|
|
Polyvinylidene chloride (Saran) |
|
|
Polyurethane |
|
|
Polyethylene (Scotch tape) |
|
|
Polypropylene |
− − − |
|
Polyvinylchloride (Vinyl) |
|
|
Silicon |
|
|
Teflon |
|
|
Silicone Rubber |
|
|
Most Negative |
|
Observations
Part A – Tape
|
Behavior of tape when charged in the same manner: (steps 1 – 2)
|
|
Behavior and properties of B and T types of tape: (steps 3 – 6)
|
|
Comparisons and conclusions comparing plastic pipe and glass rod to tape: (steps 7 – 8)
|
|
Behavior of tape when near metal object: (step 9)
|
Part B – Electroscope
|
Behavior of uncharged electroscope when charged object is near but touching: (steps 1, 6)
|
|
Behavior of uncharged electroscope that is then touched by charged object: (steps 2, 6)
|
|
Behavior of charged electroscope when charged object is near but touching: (steps 3 – 4)
|
|
Effect on electroscope when connected to ground: (steps 5, 7)
|
Part C – Induction
|
Behavior of electroscope when charged by induction:
|
Part D – Fun
|
Electrical properties of balloon:
|
|
Electrical properties of wool pad (after it is rubbed on plastic pipe):
|
|
Preparing and detecting a piece of tape that is half positive, half negative:
|
|
Discharging electroscope by charged object instead of grounding:
|
|
Charging electroscope by conduction through a wire:
|